
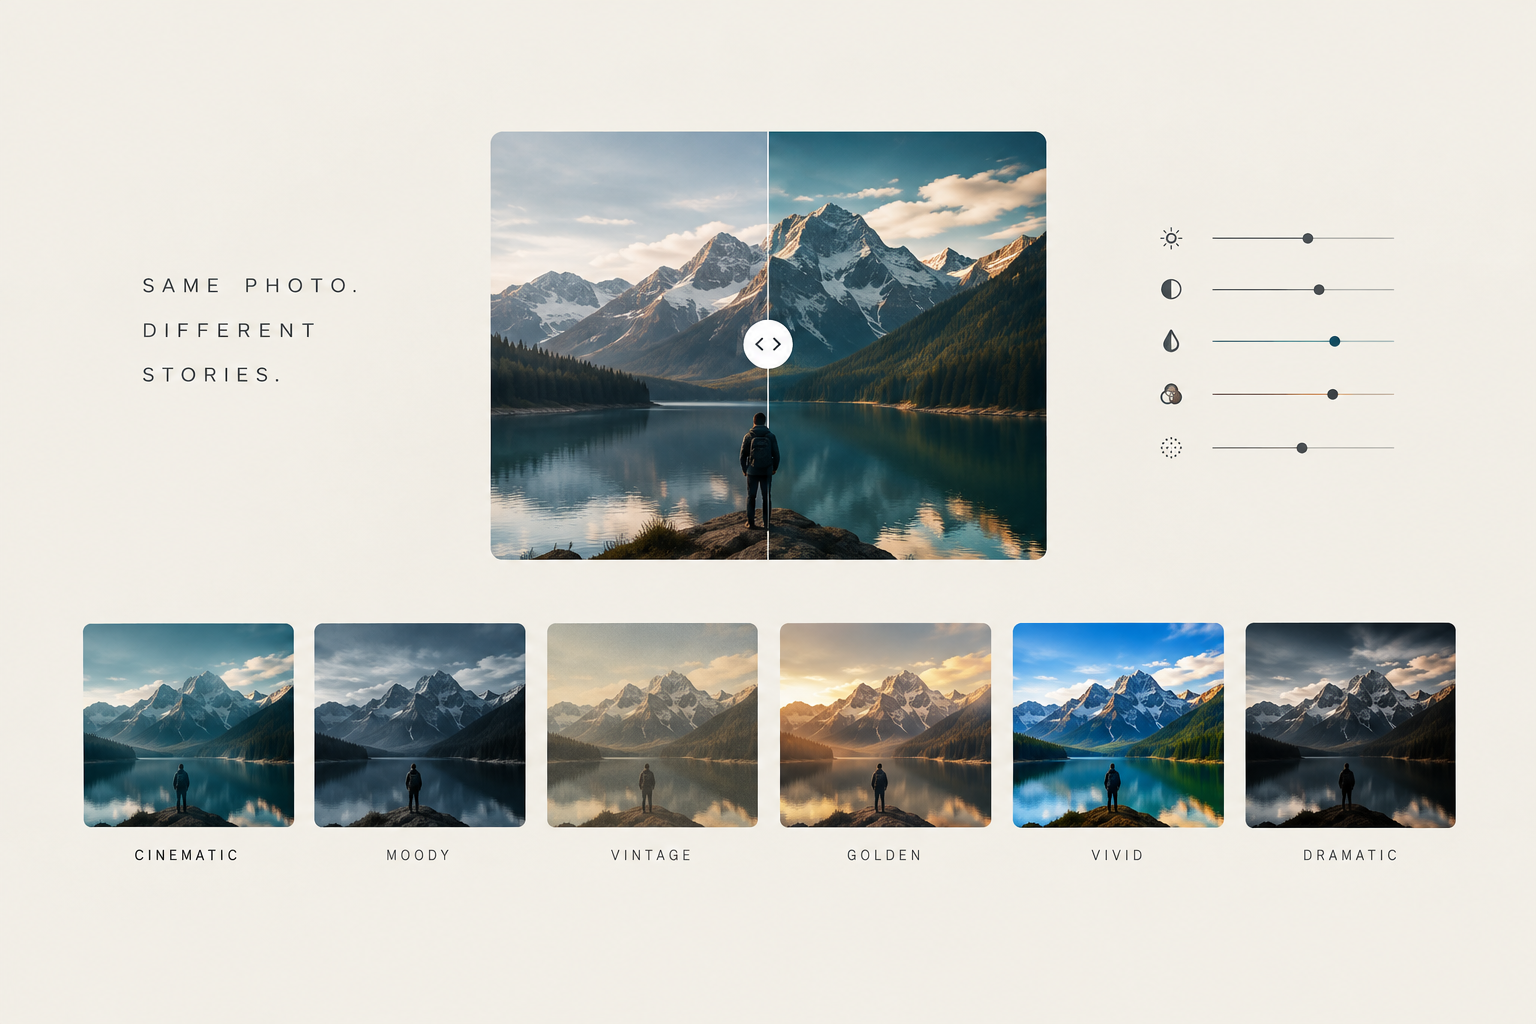
When creators look to elevate their photography, they rarely search for technical instructions like "lift the black point on a tone curve" or "pull back highlights by 20%." They search for feelings and aesthetics: cinematic, moody, vintage, golden hour.
Understanding the visual mechanics of popular aesthetics bridges the gap between what you feel and how to edit. Each look is simply a combination of specific tonal and color adjustments that signal depth, era, or atmosphere to the human eye.
Here is a breakdown of the visual science behind six sought-after photography looks and the editing recipes that bring them to life.
1. The Cinematic Look
- What it feels like visually: High-end, narrative, and deep. It imitates the rich dynamic range and deliberate color grading of anamorphic film.
- The editing recipe:
- Deepened blacks & controlled highlights: Lowering the highlights prevents a cheap, overexposed look, while deepening the blacks grounds the frame.
- Increased shadow contrast: Creates dimension and focal separation.
- Subtle cool/teal shift: Pushing shadow tones slightly toward cool or teal tones creates a classic split-tone contrast against skin tones.
- Restrained saturation: Cinematic looks rely on color harmony rather than loud, oversaturated tones.
- Gentle vignette: Subtle edge darkening naturally draws the eye toward the center of the frame.
2. The Moody Look
- What it feels like visually: Heavy, atmospheric, and quiet. Shadows hide detail, adding weight and mystery to the scene.
- The editing recipe:
- Deepened shadows and blacks: Crushing lower tones hides busy background details and concentrates visual focus.
- Lowered overall brightness: Keeps the ambient atmosphere dark and intentional.
- Lowered highlights: Softens harsh light sources to maintain low light intensity.
- Cooler color temperature: Pushing white balance toward blue reinforces a sense of solitude or chill.
- Strong tonal separation: High contrast between the brightest subject and the dark surroundings gives the image dramatic pop despite the low light.
3. Vintage / Faded Film
- What it feels like visually: Nostalgic, soft, and tactile. It mimics aged analog paper prints where the blacks have faded over decades.
- The editing recipe:
- Lifted (faded) blacks: Raising the lowest point of the tone curve washes out pure black into a dark, matte gray.
- Lowered contrast: Softens the transitions between light and dark regions.
- Slightly reduced saturation & warm shift: Simulates the natural color degradation and yellowing of aged film stock.
- Added grain: Introducing artificial noise creates physical texture across flat surfaces.
4. Warm / Golden
- What it feels like visually: Inviting, optimistic, and glowing. It replicates the soft, low-angle sunlight of late afternoon.
- The editing recipe:
- Warm temperature shift: Sliding white balance toward yellow/amber instantly bathes the scene in sunlight.
- Gentle vibrance lift: Selectively boosts muted colors without over-saturating already warm elements like skin tones.
- Soft highlight glow: Slightly lowering clarity or blooming bright areas spreads light across nearby midtones.
5. Vivid / Punchy
- What it feels like visually: Crisp, energetic, and eye-catching. Every detail pops with clarity and high visual definition.
- The editing recipe:
- Widened tonal range: Pushing whites up and pulling blacks down expands the distance between the darkest and brightest pixels.
- Increased contrast & clarity: Enhances midtone detail and sharpens edges across the frame.
- Boosted vibrance: Enhances underlying tones without blowing out individual color channels.
6. Dramatic
- What it feels like visually: Intense, bold, and high-impact. It emphasizes texture, shape, and aggressive lighting contrasts.
- The editing recipe:
- Aggressive contrast: Pulls midtones toward extremes to create sharp boundaries between light and shadow.
- Deep, uncompromised blacks: Strips away shadow detail to emphasize form over texture.
- High clarity/texture: Enhances fine surface details like skin pores, grain, or architectural edges.
- Focused vignette: Tightens the light falloff around the primary subject.
Dialing It In: The Shortcut to Creative Control
While these recipes serve as versatile starting points, dialing in dozens of individual sliders—like tone curves, split tones, and highlights—can quickly feel like a technical chore.
This is where modern editing tools step in to translate creative vision into technical adjustments. The Snapback RAW app lets you bypass manual slider tweaking entirely. Built around natural-language processing, Snapback lets you type the exact style or feel you want—such as "make it cinematic" or "apply a warm vintage look"—and automatically applies the corresponding non-destructive editing recipe directly to your photo's RAW data.
Whether you adjust every parameter by hand or leverage natural-language tools to build your base, understanding these core recipes gives you total control over the atmosphere and emotion of your images.